Contact us : contact@digitechgenai.com


Introduction
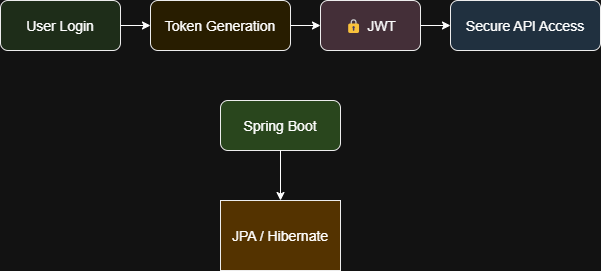
In today’s API-driven world, securing applications is non-negotiable. JSON Web Tokens (JWT) have emerged as a popular standard for authentication, offering stateless security and scalability. When combined with Spring Boot’s simplicity and JPA’s database integration, developers can build robust authentication systems quickly.
This guide walks you through implementing JWT authentication with JPA in Spring Boot 3.2.5, complete with code examples and best practices. Whether you’re building a microservice or a monolithic app, this approach ensures secure user management.
Why JWT + JPA?
- Stateless Security: JWTs eliminate server-side session storage, reducing overhead
- Database Integration: JPA (Java Persistence API) simplifies user credential storage and retrieval.
- Scalability: Ideal for distributed systems like microservices.
Step-by-Step Implementation of JWT Authentication
Imagine a food delivery app where users log in via mobile. JWT tokens validate their identity for every order, while JPA stores their profiles in a MySQL database.
Step 1: Project Setup
Prerequisites:
- Java 17+
- Spring Boot 3.2.5
- Dependencies: Spring Security, Spring Data JPA, JJWT (for JWT), Lombok.
pom.xml Dependencies:
<dependency>
    <groupId>org.springframework.boot</groupId>
    <artifactId>spring-boot-starter-security</artifactId>
</dependency>
<dependency>
    <groupId>org.springframework.boot</groupId>
    <artifactId>spring-boot-starter-data-jpa</artifactId>
</dependency>
<dependency>
    <groupId>io.jsonwebtoken</groupId>
    <artifactId>jjwt-api</artifactId>
    <version>0.12.3</version>
</dependency>
Step 2: Configure JPA Entities
Create an entity to store credentials and roles
@Entity
@Table(name = "users")
@Data
@NoArgsConstructor
@AllArgsConstructor
public class User {
    @Id
    @GeneratedValue(strategy = GenerationType.IDENTITY)
    private Long id;

    @Column(unique = true)
    private String email;

    private String password;

    @Enumerated(EnumType.STRING)
    private Role role;
}

public enum Role {
    USER, ADMIN
}
Step 3: Create a JWT Utility Class
Generate and validate tokens using JJWT.
@Component
public class JwtUtils {
    private final String SECRET_KEY = "your-secret-key";

    public String generateToken(UserDetails userDetails) {
        return Jwts.builder()
            .subject(userDetails.getUsername())
            .issuedAt(new Date())
            .expiration(new Date(System.currentTimeMillis() + 86400000)) // 24h
            .signWith(SignatureAlgorithm.HS256, SECRET_KEY)
            .compact();
    }

    public String extractEmail(String token) {
        return Jwts.parser()
            .setSigningKey(SECRET_KEY)
            .build()
            .parseClaimsJws(token)
            .getBody()
            .getSubject();
    }
}
Step 4: Implement Spring Security
Customise SecurityConfig to integrate JWT Authentication.
@Configuration
@EnableWebSecurity
@RequiredArgsConstructor
public class SecurityConfig {
    private final JwtUtils jwtUtils;
    private final UserDetailsService userDetailsService;

    @Bean
    public SecurityFilterChain securityFilterChain(HttpSecurity http) throws Exception {
        http
            .csrf(AbstractHttpConfigurer::disable)
            .authorizeHttpRequests(auth -> auth
                .requestMatchers("/api/auth/**").permitAll()
                .anyRequest().authenticated()
            )
            .sessionManagement(session -> session
                .sessionCreationPolicy(SessionCreationPolicy.STATELESS)
            )
            .addFilterBefore(jwtAuthFilter(), UsernamePasswordAuthenticationFilter.class);
        return http.build();
    }

    @Bean
    public JwtAuthFilter jwtAuthFilter() {
        return new JwtAuthFilter(jwtUtils, userDetailsService);
    }

    @Bean
    public PasswordEncoder passwordEncoder() {
        return new BCryptPasswordEncoder();
    }
}
Step 5: Create JWT Authentication Endpoints
Add a controller to handle login and registration.
@RestController
@RequestMapping("/api/auth")
@RequiredArgsConstructor
public class AuthController {
    private final UserRepository userRepository;
    private final PasswordEncoder passwordEncoder;
    private final JwtUtils jwtUtils;

    @PostMapping("/register")
    public ResponseEntity<String> register(@RequestBody User user) {
        user.setPassword(passwordEncoder.encode(user.getPassword()));
        userRepository.save(user);
        return ResponseEntity.ok("User registered!");
    }

    @PostMapping("/login")
    public ResponseEntity<String> login(@RequestBody AuthRequest request) {
        Authentication authentication = authenticationManager.authenticate(
            new UsernamePasswordAuthenticationToken(request.getEmail(), request.getPassword())
        );
        String token = jwtUtils.generateToken(authentication);
        return ResponseEntity.ok(token);
    }
}
Step 6: Test with Postman
Register a User:
POST /api/auth/register
Body: { "email": "john@example.com", "password": "1234", "role": "USER" }
Login to Get JWT Token:
POST /api/auth/login
Body: { "email": "john@example.com", "password": "1234" }
Access Secure Endpoint:
GET /api/secure
Header: Authorization: Bearer <token>
Here’s a comparison of the authentication flow with and without JWT:
| Step | Traditional Authentication | JWT Authentication |
|---|---|---|
| 1 | User logs in | User logs in |
| 2 | Server creates session | Server generates JWT |
| 3 | Session ID stored in cookie | JWT stored in client |
| 4 | Subsequent requests use session ID | Subsequent requests include JWT in header |
| 5 | Server validates session ID | Server validates JWT |
To know more about the spring cloud
Modern Spring Security 6 Configuration (Lambda DSL)
In Spring Boot 3.2.5 and Spring Security 6, the old configuration style using .and() methods is completely deprecated. Security filter chains now use the modern lambda-based DSL for a cleaner, more readable syntax:
Java
package com.example.security.config;

import com.example.security.jwt.JwtAuthenticationFilter;
import lombok.RequiredArgsConstructor;
import org.springframework.context.annotation.Bean;
import org.springframework.context.annotation.Configuration;
import org.springframework.security.authentication.AuthenticationProvider;
import org.springframework.security.config.annotation.method.configuration.EnableMethodSecurity;
import org.springframework.security.config.annotation.web.builders.HttpSecurity;
import org.springframework.security.config.annotation.web.configuration.EnableWebSecurity;
import org.springframework.security.config.annotation.web.configurers.AbstractHttpConfigurer;
import org.springframework.security.config.http.SessionCreationPolicy;
import org.springframework.security.web.SecurityFilterChain;
import org.springframework.security.web.authentication.UsernamePasswordAuthenticationFilter;

@Configuration
@EnableWebSecurity
@EnableMethodSecurity
@RequiredArgsConstructor
public class SecurityConfiguration {

    private final JwtAuthenticationFilter jwtAuthFilter;
    private final AuthenticationProvider authenticationProvider;

    @Bean
    public SecurityFilterChain securityFilterChain(HttpSecurity http) throws Exception {
        http
            .csrf(AbstractHttpConfigurer::disable)
            .authorizeHttpRequests(auth -> auth
                .requestMatchers("/api/v1/auth/**").permitAll()
                .anyRequest().authenticated()
            )
            .sessionManagement(session -> session
                .sessionCreationPolicy(SessionCreationPolicy.STATELESS)
            )
            .authenticationProvider(authenticationProvider)
            .addFilterBefore(jwtAuthFilter, UsernamePasswordAuthenticationFilter.class);

        return http.build();
    }
}
Common Pitfalls & Fixes
- Token Expiration: Always set a reasonable expiration time.
- Secure Secret Key: Store secrets in environment variables, not hardcoded.
- Role-Based Access: Extend
SecurityConfigto restrict endpoints by roles.
Conclusion
By combining JWT Authentication with JPA in Spring Boot 3.2.5, you can build a secure, scalable authentication system. This setup is ideal for apps requiring user management, from e-commerce platforms to SaaS tools.
To know more about Spring Boot, refer to this article: Spring Boot
Frequently Asked Questions (FAQ) for Featured Snippets
Adding an FAQ section structured with clear headings helps target long-tail search keywords and increases your chances of capturing Google’s Featured Snippets.
Why use Stateless Sessions for JWT Authentication in Spring Boot?
Unlike traditional web apps that store HTTP sessions in server memory, JWT (JSON Web Tokens) contain all necessary user identification and authorisation claims directly inside the token. Setting SessionCreationPolicy.STATELESS instructs Spring Security never to create an HttpSession, making your REST APIs fully scalable across distributed or cloud-native microservice clusters.
How do I handle expired JWT tokens in Spring Boot 3.2.5?
When a token expires, the JWT library (such as io.jsonwebtoken) will throw an ExpiredJwtException during token validation inside your filter. To handle this gracefully, you should wrap your filter’s token parsing logic in a try-catch block, or configure a custom AuthenticationEntryPoint to return a standardized 401 Unauthorized JSON response instead of letting an unhandled exception crash the request lifecycle.
What is the difference between BCrypt and other hashing algorithms for JPA User entities?
Spring Security defaults to BCryptPasswordEncoder, which incorporates a built-in cryptographic salt and adjustable work factor (rounds). This protects stored password hashes inside your PostgreSQL or MySQL database from rainbow table attacks and brute-force cracking attempts even if the database is compromised.