Contact us : contact@digitechgenai.com



Introduction
Reactive programming is a hot topic in the world of software development. It offers a new way to handle data and build applications that can react to changes instantly. When you combine reactive programming with Spring Boot, a powerful Java framework, you get a recipe for creating highly efficient and scalable applications. In this guide, we’ll dive into the basics of reactive programming with Spring Boot, explore its benefits, and walk through some examples to help you get started.
What is Reactive Programming?
Reactive programming is all about working with streams of data that change over time. Instead of waiting for data to arrive, you react to data as it comes in. This approach makes it easier to handle multiple events happening at the same time and can improve the performance of your applications.
Key concepts include:
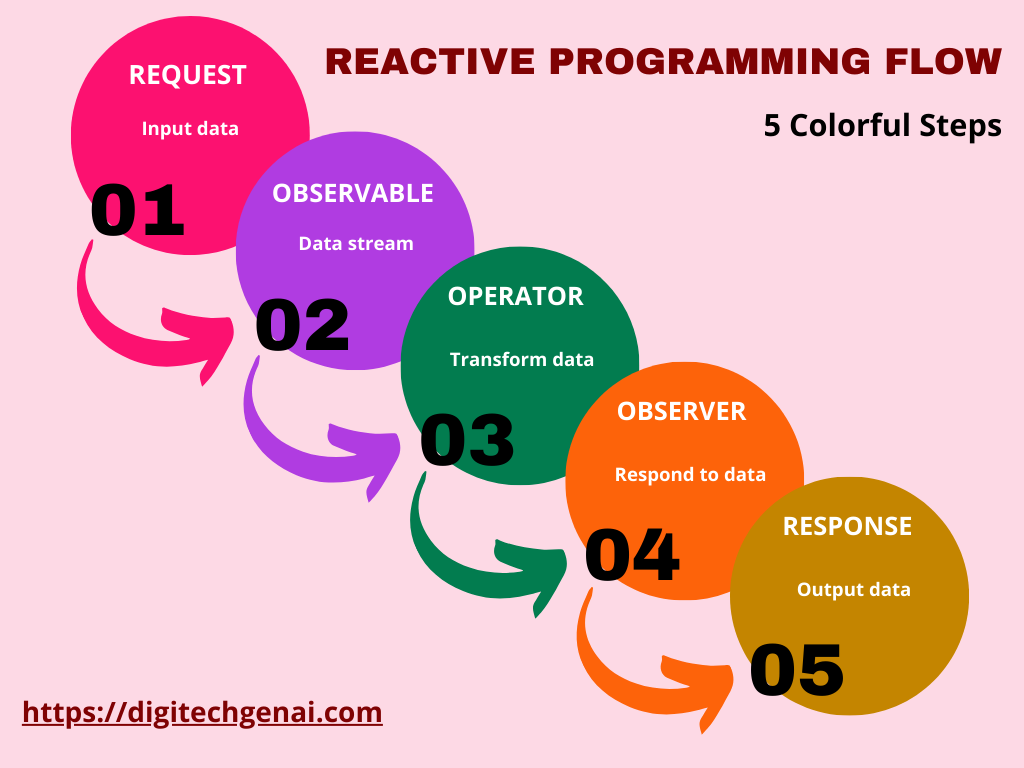
- Observable: A source of data that emits events over time.
- Observer: A receiver that reacts to events from the observable.
- Operators: Functions that transform or combine data from observables.
- Schedulers: Control the execution of reactive code, managing concurrency and threading.
Why Use Reactive Programming?
There are several reasons why you might want to use reactive programming:
- Scalability: Handle many users and events at once without slowing down.
- Responsiveness: Provide a fast, smooth user experience by reacting to data in real-time.
- Resilience: Recover from errors quickly and keep your application running.
- Resource Efficiency: Use system resources more effectively by avoiding blocking operations.
Reactive Programming Flow
Spring Boot and Reactive Programming
SSpring Boot simplifies the creation of production-ready applications with its opinionated defaults. Its integration with the reactive programming paradigm is seamless, making it an excellent choice for developers.
Setting Up Your Spring Boot Reactive Project
Let’s start by setting up a simple Spring Boot project. Ensure you have the following dependencies in your pom.xml
<dependencies>
    <dependency>
        <groupId>org.springframework.boot</groupId>
        <artifactId>spring-boot-starter-webflux</artifactId>
    </dependency>
    <dependency>
        <groupId>io.projectreactor</groupId>
        <artifactId>reactor-core</artifactId>
    </dependency>
</dependencies>
Building Your First Reactive API
Now, let’s create a basic reactive API. We’ll build a simple REST controller to demonstrate reactive programming concepts.
@RestController
public class ReactiveController {

    @GetMapping("/reactive")
    public Mono<String> reactiveEndpoint() {
        return Mono.just("Hello, Reactive World!")
                   .delayElement(Duration.ofSeconds(1));
    }
}
In this example, Mono.just creates a single-value publisher, and delayElement simulates a non-blocking delay.
Understanding Mono and Flux
- Mono: Represents a single-value or empty data stream.
- Flux: Represents a multiple-value data stream.
Let’s create another endpoint that emits multiple values using: Flux
@GetMapping("/flux")
public Flux<String> fluxEndpoint() {
    return Flux.just("Spring", "Boot", "Reactive", "Programming")
               .delayElements(Duration.ofSeconds(1));
}
Handling Backpressure in Spring Boot
Handling backpressure is crucial for maintaining system stability. Spring Boot provides built-in support for backpressure handling. Here’s how you can implement it:
@GetMapping("/backpressure")
public Flux<Integer> backpressureEndpoint() {
    return Flux.range(1, 100)
               .onBackpressureBuffer(10)
               .delayElements(Duration.ofMillis(100));
}
Using Reactive Repositories
Spring Data provides reactive repositories for performing database operations. Let’s set up a reactive repository:
@Repository
public interface UserRepository extends ReactiveCrudRepository<User, Long> {
}
You can now perform CRUD operations reactively:
@Autowired
private UserRepository userRepository;

@GetMapping("/users")
public Flux<User> getAllUsers() {
    return userRepository.findAll();
}
Error Handling in Reactive Streams
Handling errors is a critical aspect of reactive programming. Use operators like onErrorResume and onErrorReturn to manage errors effectively:
@GetMapping("/error")
public Mono<String> errorEndpoint() {
    return Mono.error(new RuntimeException("Simulated error"))
               .onErrorResume(e -> Mono.just("Recovered from error: " + e.getMessage()));
}
To know more about spring boot , refer to this article: Spring Boot
Core Concepts: Mono vs Flux
Project Reactor is the reactive library built into Spring Boot (via Spring WebFlux). It introduces two core data publishers that implement the Reactive Streams specification:
Mono<T>: Represents an asynchronous sequence that emits 0 or 1 element. UseMonofor single-item results, such as retrieving a user by ID or saving a record.Flux<T>: Represents an asynchronous sequence that emits 0 to N elements. UseFluxfor collections, event streams, or real-time feeds.
Java
// Emitting a single value
Mono<String> singleUser = Mono.just("Alex");

// Emitting a stream of values
Flux<String> userList = Flux.just("Alex", "Sam", "Priya", "John");
Key Advantages of Spring WebFlux
Traditional Spring MVC uses a thread-per-request model backed by a Tomcat servlet container. When a request waits for a database or third-party API, the worker thread is blocked.
Spring WebFlux changes this architecture completely:
- Non-Blocking I/O: Runs on an event loop (Netty by default). A small, fixed pool of threads handles incoming requests without stalling on I/O operations.
- Efficient Resource Utilization: Applications maintain low memory consumption and high throughput even under massive concurrent connection spikes.
- Backpressure Support: The consumer tells the publisher how much data it can process at a given time, preventing system memory overruns when upstream services stream data too fast.
Hands-On Example: Building a Reactive Endpoint
1. Add Dependencies (pom.xml)
XML
<dependency>
    <groupId>org.springframework.boot</groupId>
    <artifactId>spring-boot-starter-webflux</artifactId>
</dependency>
2. Create the Reactive Controller
Java
package com.example.reactive.controller;

import org.springframework.http.MediaType;
import org.springframework.web.bind.annotation.GetMapping;
import org.springframework.web.bind.annotation.RequestMapping;
import org.springframework.web.bind.annotation.RestController;
import reactor.core.publisher.Flux;

import java.time.Duration;

@RestController
@RequestMapping("/api/stream")
public class ReactiveStreamController {

    // Emitting a real-time event stream every second
    @GetMapping(value = "/numbers", produces = MediaType.TEXT_EVENT_STREAM_VALUE)
    public Flux<Long> getNumberStream() {
        return Flux.interval(Duration.ofSeconds(1)).take(10);
    }
}
When you hit /api/stream/numbers in a browser or via curl, elements stream down individually every second over Server-Sent Events (SSE) rather than waiting for all 10 items to finish processing before sending the response.
When to Use (and When NOT to Use) Reactive Programming
| Use Reactive When | Stick to Standard Spring MVC When |
|---|---|
| Building high-concurrency microservices or API gateways | Building standard CRUD web applications with low-to-moderate traffic |
| Streaming live notifications, chat feeds, or telemetry | The application relies heavily on blocking JDBC or legacy blocking libraries |
| Downstream services and databases provide non-blocking drivers (e.g., R2DBC, MongoDB Reactive) | The team is unfamiliar with functional programming and asynchronous debugging |
Would you like an end-to-end example with R2DBC database connectivity (reactive PostgreSQL/MySQL) or custom exception handling in WebFlux?
Conclusion
Reactive programming with Spring Boot provides a powerful paradigm for building responsive and resilient applications. By embracing non-blocking, event-driven approaches, you can create scalable systems that handle data streams efficiently. Start experimenting with the concepts and examples provided, and you’ll soon master reactive programming in Spring Boot.
To know more about the courses, refer to this article: Courses